Again there were a multitude of U Tube Videos to wade through. There seemed to be three distinct types
- Plastic Pipe Construction using the tension of the plastic to keep up the tension of the nichrome wire (you can see the lack of tension in the wire).
- A wooden/metal construction using either all wood, or a combination of wood and wire, which is free standing and requires manual guidance over the templates.
- A Cutter made as per types 1 or 2 above but which is guided over the template using a pulley system with weights.
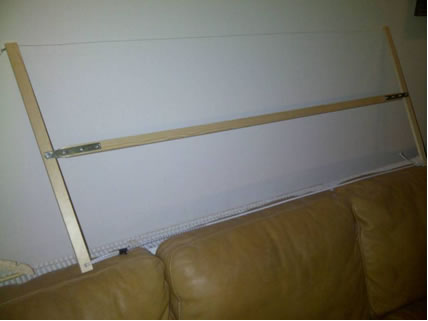
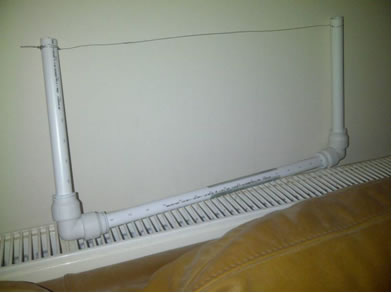
After a lot of umming and aaaing, I plumped not to bother with a pulley system, principally because I hope I will have someone to help me if I needed it, and also because the wings I will have to make for the Alpha Jet are small and easy to manage.
The most helpful video I saw was by a lively elderly Australian modeller called “Bruce”. This is the video. The URL is http://youtu.be/beUvirvUUOw He also explains how he built his transformer.
I thought Bruce’s idea of using elastic to keep the tension up in the wire was a good one.
I was worried about him using aluminium to harness electric current. As my wife’s grandmother once said, “Washing Machines are dangerous because you are mixing electricity and water!” So I substituted the aluminium for wood. I have seen others made out of wood. I just hope I can crank up the tension enough without it breaking.
What type of wire should I use?
I read that I should use .6mm welding wire – at least Aussie Bruce said so in the video, so I went on the internet and found a length of Wire for a Cutter on Ebay, which travelled all the way from Germany, and came with its very own end pieces to crimp to the wire and aid tension.
I had decided, however, to make 2 foam cutters, so needed 2 pieces of wire. I went into Macclesfield, but it was Bank Holiday, and Kenyons were closed, so I ended up at Tool Station, where I bought a length of 0.6mm welding wire, which I thought would do, until I realised that it was mild steel, and not nichrome, ie made of nickel & chromium (what you need is the same type of wire as is used on the old electric bar fires. So I went back to Ebay and for £1.75 bought a length of the correct type. As it was rated as 30swg I went onto a site which converts millimetres to swg – here - http://www.clag.org.uk/swg.html
So then I set about putting together a frame for the small and large cutters.
For the smaller foam cutter I went to B&Q where there were only bendy plastic pipes, so I bought some wooden dowel to push down the middle and add strength. It all fitted together very quickly. You can see the smaller cutter. Whilst it works, because plastic water pipe is now bendy, the joints move and it does not keep the cutting wire under enough tension, so I have decided to simply make a smaller wooden version of my big cutter using bungee cord to tighten the wire. I think that will work better.
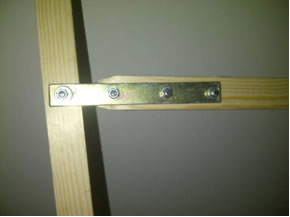
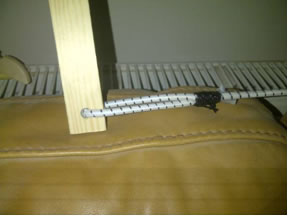
You can see that I simply used a piece of metal bracket and bolts (4mm) to joint the cutter, and a length of bungee tied up with black cord to create the tension you definitely need for the wire. The wood was about 1” x 3/8”. May be go for something a bit stronger to take the tension. I was thinking of weight and manoeuvrability.
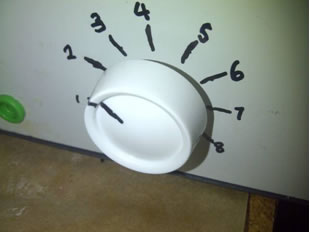
For the smaller cutter to work you need the “volume” control on about 4 to 5 and for the big one maximum of 8.
As it shows in the diagram, you simply use the small crocodile clips to attach the wires from the box to the end of the wires on the cutter. I think I will use some Velcro battery straps to tie the wires out of the way from the hot wire.
If you want more heat, and you were cutting something narrow, you could simply place the wires closer together, which is the same as using a smaller cutter. Then only the wire between the clips is being heated up, and the voltage can be lower for the same heat.
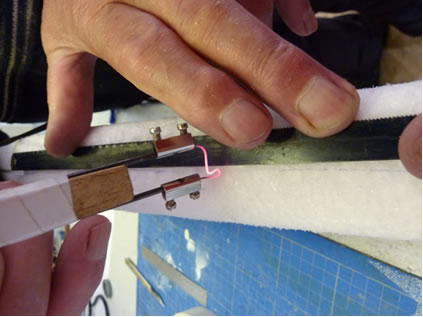
Finally, I thought I would pinch Ivan’s photo of his hot wire cutter pen which he uses for cutting servo holes in wings, or groves for carbon wing spars. You could instead, of course, use a gun type of soldering iron. The beauty of Ivan’s device is that one can make several different length nibs for different depths of cut.
So wish me luck. Next time I will let you know my experiences when I cut my first fuselage.
